Monny's Condo FAQ
Any doubt regarding the FAQ? Contact me on discord! "monsterwhore." Yes, the dot is part of it.
Carrd updated: March 2nd, 2026.
Head back to the main hub here.
How do I use a Goat file?
If you're here, chances are it's your first time using a Goat file! Whether it be Diet Yumi, Yumi Goat, EchGOATED, etc... These files are all 'goat' in principle. That is, an extensive morph customization and animation variety.
This explanation page assumes that you've already got yourself a Goat file (or well, if you're playing a game, that works too). We'll go specifically on Solo Testing. For a tutorial on how to test the studio file with other people, you can check out my saving guide.
When in Studio, you can start testing the file through the dropdown at the upper left corner of the screen. Test -> Start Test Session -> Test (F5).
With that, it should be pretty self-explanatory. Time to go over how to use the file to its full extent.
For my example, I'll be using Yumi Goat v2.6.
User Interface
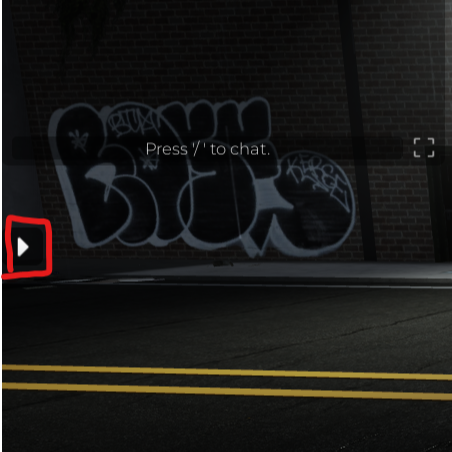
To begin your journey on character customization, click the arrow on the left side of your screen to reveal the user interface.
Now that the UI is revealed, you can hover over each button to see what they do. This guide won't go over the self-explanatory buttons (such as walkspeed, camera view and reset character).
1. Avatar Modification
An advantage of Goat files is that you can use whatever Roblox Avatar (someone else's, or you can just input the cosmetics as I will show).
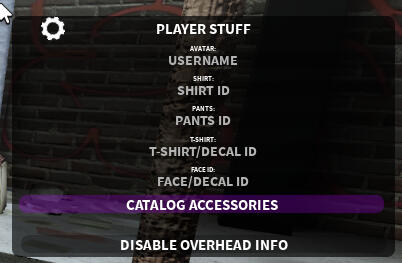
To do this, you'll click the icon of your character, which will show the text "Player Stuff".
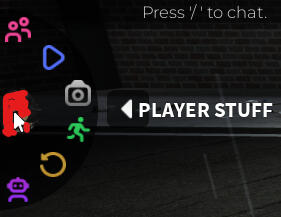
This will allow you to change into someone's avatar by putting their username, or simply change your clothing by putting in the ID.
Furthermore, you can click on Catalog Accessories to view your current accessories. You can remove them, or add any accessories through their ID, allowing you to practically make any avatar inside the file.
If you need to change your skin color, you'll find it in 1.2 Morphing section.
Do note: Goat is only R6.. R15 cosmetics do not work here.
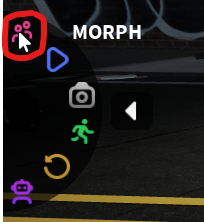
2. Morphing
If you wish to morph your avatar (i.e body, genitals, skimpy clothing), you'll want to click the upper button in the UI, labeled as "Morph".
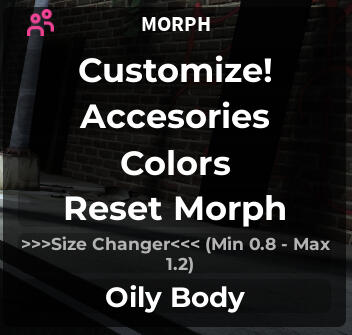
In here, you can change aspects about your avatar.
Colors will allow you to change your skin color.
Oily Body will make your avatar glossy.
Reset Morph will remove all the morphs that were added inside Customize!.The main focus is the Customize! button, which will be explained in the next slide.
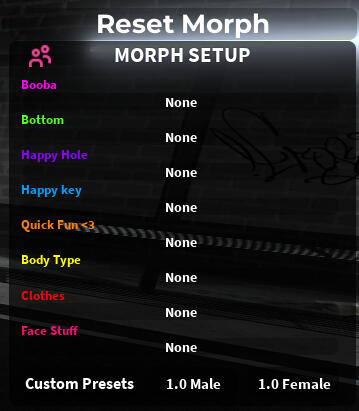
This menu has EVERYTHING morphing wise. Clicking on the "None" button will allow you to modify the respective morph of its category.
I reccomend starting with Body Type, and then moving onto any genitalia.
If you wish to remove a morph, you can search for the "None" morph, present in all categories.
The only category that can be 'stacked' (you can put multiple of them) is the Clothes category.
The Reset Morph button will remove all morphs.
The 1.0 Male and 1.0 Female buttons give you the respective torsos of the Roblox Body.
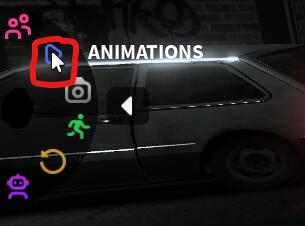
3. Animations
Now that you're morphed, you can head to the Animations tab.
Make sure that you get into a seat first, though. They're blue/pink squares located around the maps, or that you can most likely spawn through the Seat Spawner in your inventory.
The seats are color coded, with Blue being the seat for the person who's fucking, and Pink for the person who's gonna get fucked.
To put it in blunt terms.
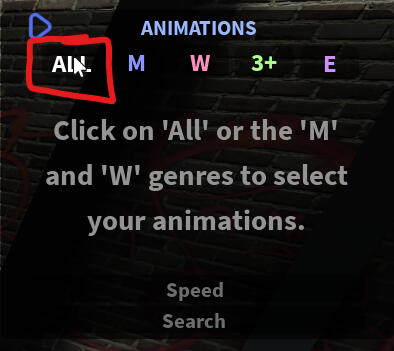
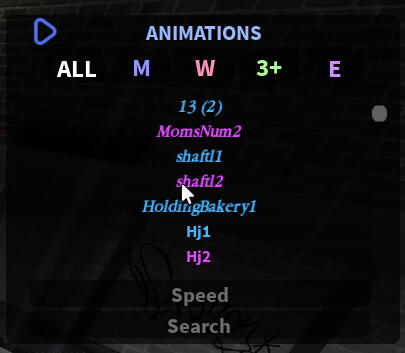
Click on the "All" button to show all of the animations. In there, you'll see the animations are color-coded as well, following the same rule.
The Speed allows any number (usually, it's from 0 to 5). The default speed is 1.
For the animation speed to be the same for both players, you'll have to click on the other player to Request Sync, and they'll have to accept the request on the bottom left of their screen.
Syncing ONLY affects Animation Speed.
An important thing to know: in most Goat files, both players have to input the animation.
For example: To perform the animation "Shaftl", the person in the pink seat will have to do shaftl2, while the person in the blue seat will have to do shaftl1.
4. Bot Settings
This button will allow you to do anything Bot related.
In here, you'll be able to spawn/teleport a bot, morph it, and make it perform animations.
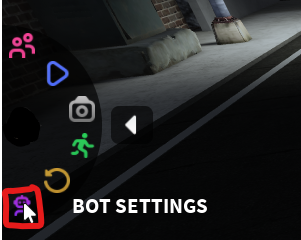
You can hover over each button to see their usage, being practically identical to the ones player have.
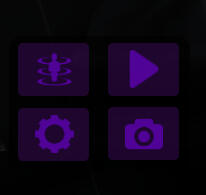
To spawn a bot, simply click the Cogwheel icon, labeled "Bot Stuff", and click the Spawn/TP Bot button. With it spawned, you can now customize it through the Bot Morph button.
Note: Yumi Goat v2.6 Has automatic bot animation syncing, which means bots will perform the matching animation with you. If your file doesn't have this, you'll have to manually input the animation inside the Bot Settings menu.